
AWS has been buckling down on its AI offerings over the past couple of years, first with Amazon SageMaker and Bedrock and now with the release of its new AI service Amazon Q, which it announced at re:Invent in November 2023.
The primary goal of Amazon Q seems to be bundling AWS’s AI efforts into one product with a great out-of-the-box user experience. It covers many use cases, from business to development to DevOps. But can it deliver on them all?
There’s already lots of debate about the usefulness of Amazon Q in the dev community.
So what’s the deal? Amazon is doling out millions of dollars to startups that build applications with generative AI. Is Q another attempt to hop on the AI train, or has AWS stayed true to its customer obsession?
Let’s take a look at what Amazon Q is, what it does, and whether you should be using it for your projects. This marks the first part of a three-part IOD research series of AWS Q.
What Is Amazon Q?
With Amazon Q being added to the AWS service portfolio, it’s not just another infrastructure capability with an API to a large language model (LLM) but a set of applications enabling developers and non-technical people to leverage AI. It is well-integrated with AWS services.
If you’ve ever struggled to navigate AWS docs or blog articles, you should be stoked about Q, which comes with a RAG index containing 17 years of AWS documentation and blog posts!
Want to find the best EC2 instance for your workload? Ask Q, and get an answer in seconds.
Amazon Q offers two categories:
- Amazon Q Business: Features a bundle of GUI tools that lets you build chatbots. It uses retrieval augmented generation (RAG), enabling you to supply an LLM with custom, up-to-date data without having to constantly train or fine-tune the model. It also lets you use natural language queries in Amazon QuickSight.
- Amazon Q Developer: A generative AI service tailored to software developers’ needs, with extensions for popular IDEs like VSCode and JetBrains so you can add your favorite IDE. Q comes with in-line code generation, refactoring, explanation, and vulnerability scanning. It even has a development agent feature to generate whole projects from your chat prompts. Its index of AWS docs and blog posts gives you access to the whole AWS knowledge base right where you write your code.
The Basics: What Is RAG?
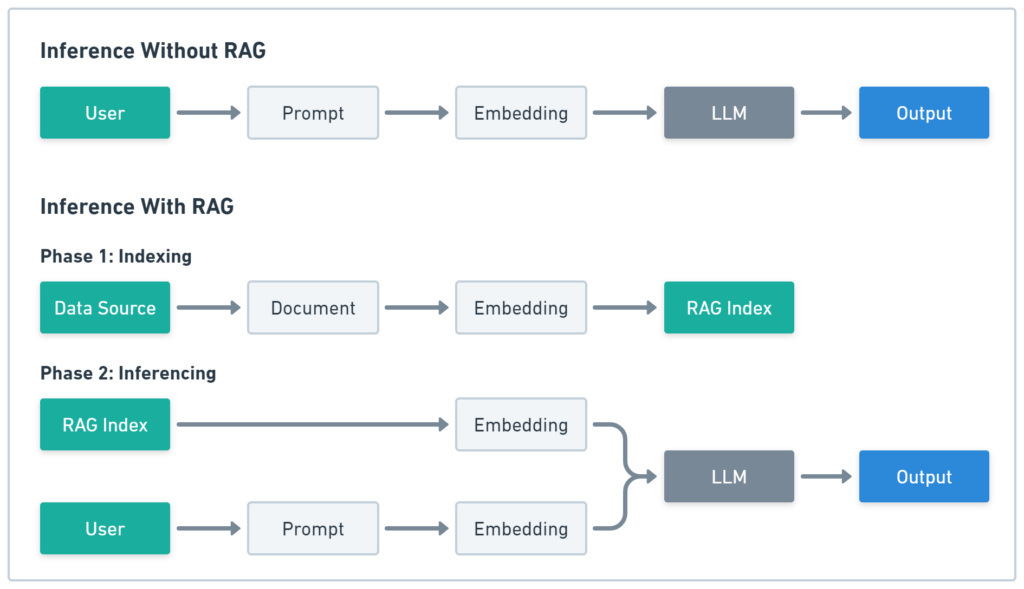
Retrieval-augmented generation (RAG) is a system connecting a language learning model (LLM) to a vector database. It converts your documents (e.g., blog articles or docs pages) to text embeddings, numerical representations of your content. Your content is then stored in the vector database, which uses the embeddings as an index. When a user queries the system, it conducts a similarity search in the vector database and adds matching content to the query before sending it to the LLM (Figure 1 below). This enables an LLM to use external data without fine-tuning it, which can be time-consuming.
Next, let’s move on to the chatbot.
How to Set Up Amazon Q
Now that we’ve covered what Amazon Q is about, let’s look at how to set it up.
While basic inline code completion works without an AWS account, for the full experience, you’ll need an account and an Amazon Q subscription.
Let’s walk through it step by step.
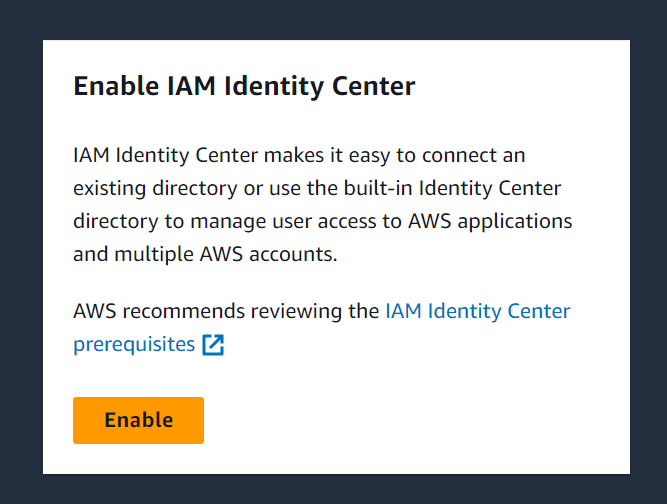
First, you need to create an AWS IAM Identity Center in the region where you want to use Q (If your “Subscribe” buttons are all grayed out, this could indicate issues with the Identity Center.).
Some features aren’t available outside us-east-1 (N. Virginia), so we’d recommend creating the Identity Center there. Still, most features will work in any region, so just make sure to open Q in the region with your Identity Center.
Note: Only one AWS IAM Identity Center is permitted per account, so if you already have one outside of us-east-1, you can’t create another one in us-east-1.
You can create an Identity Center in the AWS Console (Figure 2).
Once the Identity Center is up and running, you must create a user.
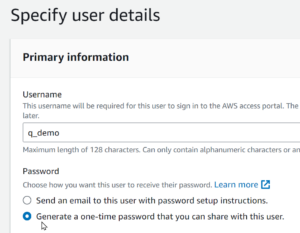
Note: Regular IAM users don’t work, hence the need for the center. You can create one in the AWS Console. Go to “Users” in the left navigation menu and click the orange “Add User” button at the top right.
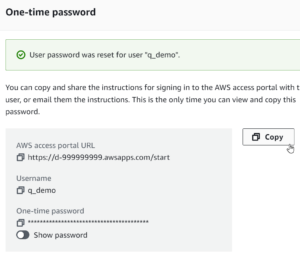
To get started right away, we recommend generating a one-time password (Figure 3) so you don’t have to deal with emails. Be sure to copy all your login credentials (Figure 4), as you’ll need them when setting up Amazon Q for your IDE later on.
After creating the user, visit the AWS access portal URL once to set a new password and MFA for the account.
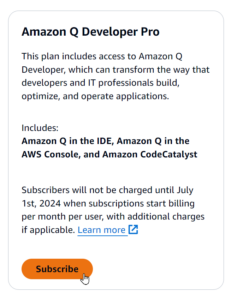
Next, go to Amazon Q and create an Amazon Q Developer Pro subscription (Figure 5) to gain access to all Q features (Developer Pro includes Business Lite and Business Pro).
In the creation wizard, search for the name of the Identity Center user you created in the previous step.
Note: Subscriptions were free until the end of June 2024. After the free trial period, Amazon Q Business Lite costs $3/user/month; Amazon Q Business Pro costs $20/user/month, and Amazon Q Developer Pro costs $19/user/month. However, as I was experimenting with Amazon Business, I was charged around $50 for one week of usage. There was no explanation as to why.
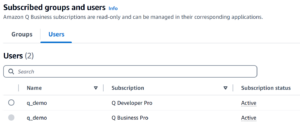
If you did everything correctly, your subscription list should look like Figure 6. Now, you can use Q features with all supported AWS services.
Using Amazon Q Business
Now that you can access Q, let’s try it out by creating a Q Business Application—the name of the AI chatbot mentioned above.
Go to the AWS Console and click the “Try a quick application” button to open the application creation wizard. Follow the wizard’s default settings to create the app.
Figure 7 shows the first step of the wizard. Here, you have to name your application and grant it permissions. If you’re unsure about the roles, you can use the default settings.
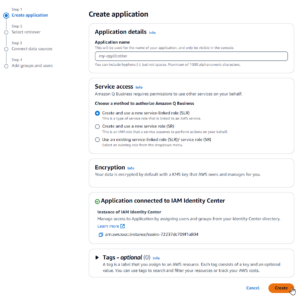
Figure 8 shows the second step of the wizard, where you select the retriever and index types. This defines where the RAG system will store the data. You can keep the default configuration.
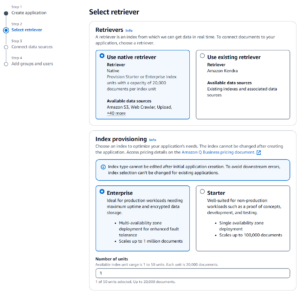
Figure 9 shows the third step of the wizard.
This part is particularly interesting, as it shows the vast number of data importers you can use with Amazon Q Business—from simple files and web crawlers to databases and ticket systems. Q comes with an importer that makes it easy to load and index, regardless of where your data is located.
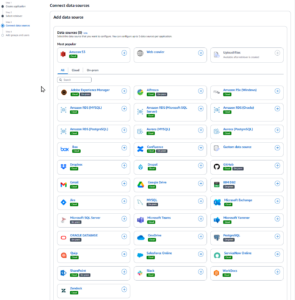
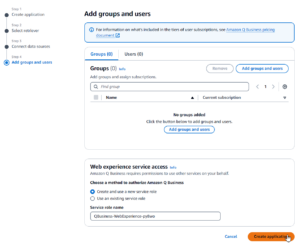
Figure 10 shows the final step of the wizard. Here, you can add the users and groups from your IAM Identity Center.
After you create the app, select it from the “Applications” list and click on the name of your app. You should now see the application details and be able to change its settings and appearance.
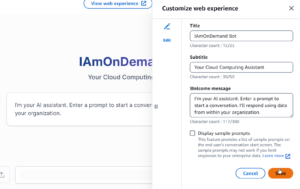
Under “Customize web experience” (Figure 11), you can change the appearance of the website you use to talk to your chatbot. There is also a “View web experience” button where you can test the bot; however, until a data source is linked, it won’t provide any meaningful answers.
Adding a Data Source in Amazon Q Business
As seen in Figure 9 above, Q Business comes with a wide range of importers. Each will load all data from your source and add it to the RAG system. These make it easy for an LLM to find information and reference it.
Return to your application details, scroll to the “Data sources” section, and click the “Add data source” button on the right. You can select the “Web crawler” data source at the top directly in order to access the data source creation wizard.
Give your data source a name, then scroll down to the “Source” section and add your website URL.
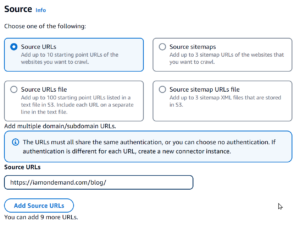
Figure 8 shows the options in the source section. As you can see, the web crawler is quite flexible.
The easiest way to add a URL to the web crawler is by using “Source URLs,” but you can also upload lists of URLs or even use your website’s sitemap. In Figure 12, I used the URL to the IOD blog.
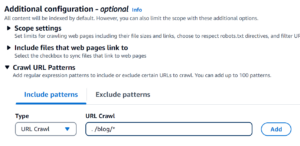
You can keep most of the default settings, but you might want to tighten your scope so you don’t accidentally crawl your whole site. Under the “Sync scope” section, you’ll find options like “Sync domains only” to prevent the crawling of subdomains and “Crawl URL patterns” where you can filter all URLs on your page.
In Figure 13, I added a pattern that only matches blog posts, so the crawler ignores all other links in a blog post.
The “Sync run schedule” section (Figure 14) is also crucial, because it lets you define when your crawling will be executed. Sometimes, you only want to do it on demand, but if you don’t know when a website changes, you might want to crawl it regularly. If you select on-demand runs, you must manually execute the crawling after creating the data source.
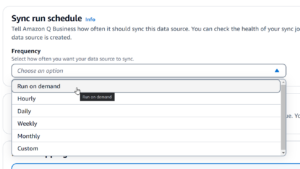
The first run can take some time, depending on the size of your website, but after crawling your website and gathering all data, you can share the URL web experience with your users. The access to the chat will be guarded by the IAM Identity Center you created initially. You’ll need to add new users to the Center to grant more people access. Amazon Q Business allows you to do so at the bottom of your application details.
To test the bot, open the web experience and ask it a question.
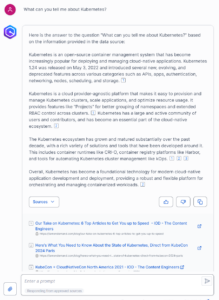
In Figure 15, I asked the bot about Kubernetes, and it answered with information it found on the IOD blog. The chatbot included links to the resources, so you can verify the information. RAG stores each article, which enables the LLM to reference it, making this possible.
Amazon Q Guardrails and Security
Amazon Q doesn’t just allow you to build chatbots quickly; it also gives you the tools to secure it. You can also add topic controls to your bot to prevent it from answering specific questions.
In the example of a bot based on the public IOD blog, this might not seem useful, but you still have to pay for data going out of AWS, so using this bot as an internal tool could save on traffic and still enable IOD employees to find topics quickly.
You can find the “Topic controls” in the application menu on the left under “Enhancements” and “Admin controls and guardrails.” If you open that page, you’ll find a “Create topic control” button on the bottom right, which allows you to define rules for questions.
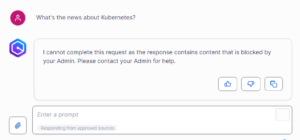
Figure 16 shows a topic control that blocks Kubernetes.
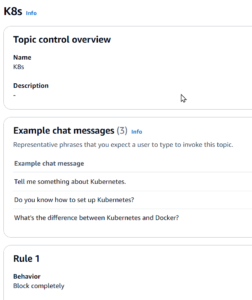
Figure 17 shows that the chatbot no longer answers Kubernetes questions.
Using Amazon Q Developer
Amazon Q Business is a useful tool to support end users including soft users (e.g., marketing, website visitors) as well as solution architects and researchers, while Amazon Q Developer provides practical results (e.g., generating scripts) and not just informational answers.
Let’s look at Amazon Q’s development features in the IDE with VSCode as an example.
Installing Amazon Q for VSCode
You must install the Amazon Q extension for VSCode, as demonstrated in Figure 18.

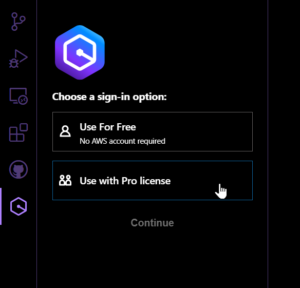
Following installation, you should see an Amazon Q symbol in the menu in the left toolbar. Click on it and select “Use with pro license.”
For the login, you’ll need the correct AWS region and the AWS Access Portal URL from the IAM Identity Center installation (discussed at the beginning of this article). It looks something like this:
https://<ID>.awsapps.com/start
After you enter the correct region and URL, your browser should open and guide you through the login process. When the login is complete, you can use all Amazon Q features directly in VSCode.
Generating Code in Amazon Q
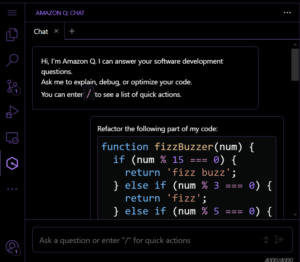
Amazon Q is capable of handling basic code-generation tasks.
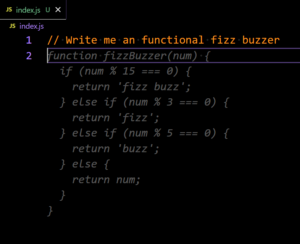
In Figure 20, you can see how it creates a fizz-buzz function.
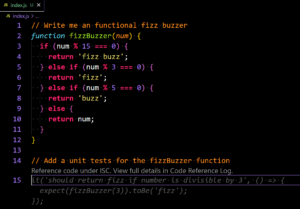
Figure 21 shows it writing a unit test for it. It seems to understand the file’s content and can extend existing code.
Explaining, Refactoring, and Fixing Code in Amazon Q
If you select the code and right-click on it, you’ll see the new “Send to Amazon Q” context menu (Figure 22). You can choose if Amazon Q should explain, refactor, fix, or optimize your code.

All these actions will send the selected code to the chat sidebar, where Amazon Q will discuss the potential changes with you (Figure 23).
You have to copy the changes manually back to your file, which is a bit cumbersome, but other than that, I was impressed.
Generating Projects with Developer Agents in Amazon Q
Q’s most interesting development feature seemed to be the development agent, which can create whole projects from scratch. But there are still lots of kinks to sort out.
I tried to generate a GraphQL API for a blog with the following prompt:
Implement an API for a blogging platform.
The API needs the following features:
- Signup
- Login
- List all articles
- View an article
- Create an article
- Update an article
- Delete an article
Use the following technologies:
- Node.js
- GraphQL
- SQLite
- JSON Web Tokens
Important tasks:
- Create a new file for each of the seven features mentioned above.
- Write test cases for each feature.
- Add a package.json file with the correct dependencies.
Q generates a step-by-step plan, which you can review to check if anything is missing.
Right now, these plans are very coarse, and issues often crop up after the implementation step.
While Q encourages you to discuss the plan, any changes you propose could be destructive.
For instance, if you forget to ask for an example frontend and propose it as a change to the existing plan, Q will delete the entire plan, generating a new one that includes only the frontend but missing the API.
The generated code is often broken. It has simple logic errors, imports files it didn’t generate, or doesn’t install dependencies. This wouldn’t be much of an issue if you could easily and quickly iterate on the generated code, but that’s not the case.
While agents consider existing code, things can quickly get confusing when a change moves a file.
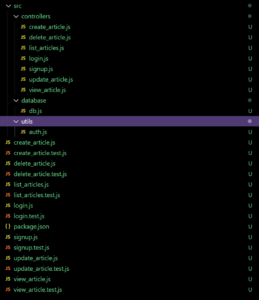
For example, Q generated all files in one directory after running the above prompt. I started a new session and asked Q to update the directory structure:
Can you restructure my files so they aren't all in the same directory?
Q created new directories and added the content of the existing files into the new ones, but it also kept the old ones (Figure 24).
It takes more time to prompt Q, wait for the answer, and clean up issues later than manually restructuring. Usually, Q takes around 3-5 minutes to complete a development task; the cleanup can take another 5-10 minutes for small examples—even longer for big ones. Going through the files and putting them into the correct folder is much quicker.
Does Amazon Q Live Up to the Hype?
After trying out both Amazon Q Business and Amazon Q Developer, I must say, I’m torn.
Q Business’s chatbot wizard is a force to be reckoned with. Its extensive range of data sources empowers non-technical individuals to construct chatbots using internal or public data. The inclusion of guardrails features, in theory, ensures the non-leakage of sensitive data.
The Q index, a feature of Amazon Q Developer, is a time-saver. How many hours have we spent manually sifting through the AWS docs?
With Amazon Q, you can pose queries and locate the relevant pages in seconds. But Q might not be the answer if you encounter issues with security-related AWS services, such as the IAM Identity Center, as this could inadvertently lead to the creation of security vulnerabilities.
On the other hand, the developer features are either basic or crude. The integration with the IDE is pretty helpful, and the autocomplete works most of the time—but only for basic coding tasks.
The development agents are really exciting, as they can generate whole projects from scratch; the results aren’t very useful though, and still require lots of manual cleanup work.
The UX isn’t so great either. You can discuss development plans or generated files with Q, but it will quickly forget what it generated, creating something new but incomplete.
Check out part 2 of our AWS Q blog post series, where we cover AWS Q use cases.
—-
Need AWS-related blog content?
Since its founding, IOD has been serving AWS Partner Network clients, delivering technical content at scale written by experts with deep hands-on experience in cloud, security, DevOps, AI, data engineering, and more.
Cut AWS review times and achieve impressive ROI.