We’re in the fourth industrial age, where data is accumulated, collated, analyzed, and interpreted at lightning-fast speeds. Highly competitive organizations enhance their platforms with AI, but many companies are unable to process the information they collect and use it in a meaningful way because they have insufficient computing resources, storage, and even availability. That’s where cloud-native AI and machine learning (ML) like Amazon SageMaker come into play. In this post, you’ll learn about Amazon SageMaker—what it is and how to use it.
Machine Learning in the Cloud
Cloud-based machine learning enables organizations to access high-performance resources and infrastructures that they couldn’t use (or even afford) on their own. Today, cloud use involves networking, storage, and computing, but when cloud computing is combined with ML to form the “intelligent cloud,” its capabilities increase and it is much easier to protect, scale, and handle. With the great strides taking place in cloud and machine learning development, their future seems ever-more tied together.
Although cloud computing is not new, some organizations have yet to embrace it. The question that comes to mind is: What do you gain by running ML workloads in the cloud? Below are some answers.
Reduced Costs
Hosting your learning workloads on the cloud will save you a considerable amount in capital costs because you won’t need any physical hardware investments.
Also, you won’t need to hire professional personnel to maintain the hardware, since cloud service providers buy and manage the hardware equipment themselves.
Availability
In an on-premise work environment, anything can happen. Things break apart: processors burn, hard drives get corrupted, and networks get interrupted.
The cloud aims to deliver abstract computing space, memory, and power, making you forget about the challenges of the physical world. Fortunately, most cloud service providers are reliable and maintain 99.9% uptime, so your Machine Learning team or engineers can always get their work done on the cloud. And of course, you can access ML services on the cloud from anywhere at any time.
Elasticity
Often, businesses don’t predict their future needs correctly and purchase more hardware than they need or else don’t have enough servers to handle computing tasks. Sadly, as they try to correct their errors, the process becomes more and more expensive.
The cloud enables businesses to experiment with different ML technologies and scale up or down as and when needed. With nominal monthly fees, they can expand capacity.
Of course, the resources of every cloud service provider are limited, but they’re still far beyond what 99% of businesses will need. A good cloud computing system has many different tools, bandwidths, and storage space options.
On-Demand Self-Service
When machine learning workloads are hosted in the cloud, you can access them at any time without administrator approval, as you would need with on-premise data centers. Cloud computing achieves this through automation and self-service.
On-demand self-service also helps businesses to plan. For instance, you can request new virtual machines or storage capacities at any time and expect to have them within seconds.
Broad Network Access
With machine learning workloads hosted in the cloud, you’ll have unlimited data access privileges. Machine learning uses data as its input for smarter decision-making and improved performance, and cloud environments can hold massive volumes of data. That means that using ML in the cloud will help you overcome the delay in traditional silos and accessibility. ML and AI are also great instruments for transferring data between the on-premise infrastructure and cloud environment.
Amazon SageMaker Cloud ML Service
Amazon SageMaker is a fully-managed service that helps data scientists, analysts, and software developers to build, train, and deploy machine learning models on the cloud.
SageMaker provides an integrated Jupyter notebook environment for easy, seamless access to your data sources for analysis and exploration, as well as optimized ML algorithms that can run effectively against a huge amount of data in a distributed environment. SageMaker helps to remove any obstacle that might prevent you from building ML solutions or cause a delay.
How SageMaker Works
SageMaker has a three-step process that simplifies machine learning modelling. Let’s take a look:
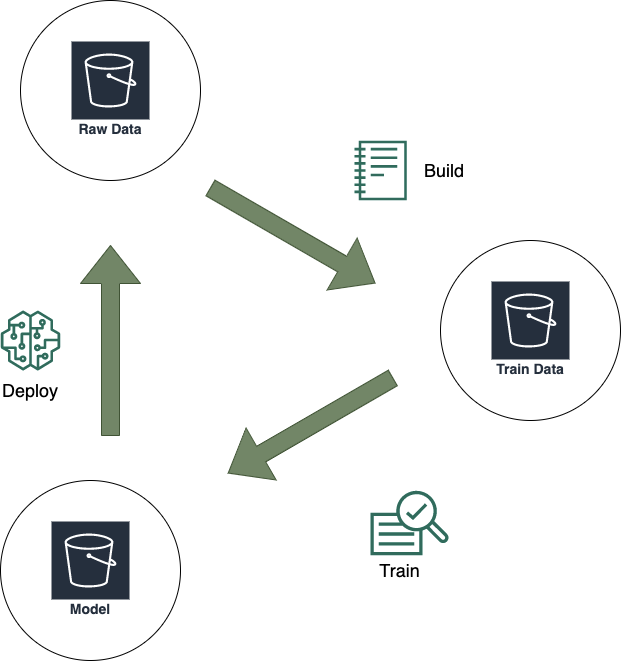
Build
SageMaker has a completely integrated development environment you can leverage to build production-ready ML models. With its hosted and easy-to-use Jupyter notebooks, you can visualize and explore data stored in Amazon S3. Besides, SageMaker also comes installed with tons of optimized ML algorithms.
Train
You can use SageMaker’s Experiments to organize, track, assess, and compare every iteration to ML models. You can train your ML model on a managed infrastructure by making a simple API call or via a single click. With the help of its automatic model tuning capabilities, you can select the best set of hyperparameters from your preferred algorithm.
Deploy
After model training and hyperparameter tuning, your next step is to deploy the ML model to generate predictions for batch data or new data. Once the model is deployed, it will be hosted on auto-scaling Amazon ML instances across several availability zones for high availability and performance.
Amazon SageMaker Features
SageMaker has many useful features that make building, training, and deployment of ML models easy for users. These include the following:
Inbuilt Machine Learning Algorithms
Amazon SageMaker comes installed with many ML algorithms that you can use to train big datasets. These algorithms are always available and optimized for accuracy, scale, and speed.
SageMaker includes supervised ML algorithms such as logistic/linear regression and XGBoost. These algorithms are used to solve time series prediction or recommendation problems. SageMaker also includes support for unsupervised learning, such as principal component analysis and k-means. These unsupervised algorithms are used to address problems like clustering and customer segmentation.
End-to-End Machine Learning Platform
An end-to-end machine learning platform is a platform designed to speed up modeling and deployment and ensure scalability and reliability in production. Amazon SageMaker supports the end-to-end lifecycle of ML applications, from data collection to model building, training, deployment, and scaling.
Zero Setup
Research shows that there’s an increasing demand for ML, and the future of ML is promising. Yet according to a 2018 US Census Bureau survey of nearly 600,000 businesses, a mere 2.8% were using machine learning, and only 8.9% were using any form of AI. This shows that many enterprises are facing a crucial knowledge gap—but the cloud offers a solution.
Amazon SageMaker lets you implement ML features without some of the operational overheads experienced with on-premise setup. SageMaker also provides the APIs and SDKs, freeing you from responsibility for setup, and you can embed ML functionalities on the go.
We know tech blogging
Pay for What You Use
Using the cloud gives you cost-effective resourcing and increased agility. With AWS SageMaker, you pay only for resources that you use. When building, training, and deploying your ML models on SageMaker, you’ll be billed by the second, with no upfront commitments and no minimum fees. Pricing is broken down by on-demand ML storage, ML instances, and data processing.
The pay-as-you-use model is perfect for bursting ML workloads and helps you leverage the power and speed of GPUs for training without incurring the costs of hardware investment.
Flexible Model Training
ML model development can be an iterative, expensive, and complicated process. Also, model training jobs can take anywhere from minutes to hours or even days. With SageMaker, you can efficiently train and build ML models at scale. This means you can experiment with ML capabilities and services and automatically scale based on resource demands.
Training Your First Model on Sagemaker
On a cool Monday morning, you get an email from your boss saying, “Our focus for the next quarter is building an application that predicts whether a customer will sign up for a Certificate of Deposit (CD).” Our target customers are people who are looking to invest their capital. Your job is to build a machine learning model capable of predicting if a customer will enroll, given the features and the data from the marketing team. This is a typical end-to-end ML project that you can efficiently build and deploy on SageMaker. In this section, we’ll learn how to get started with SageMaker and to train and deploy ML models on it.
Note: To use the service, you’ll need to create an AWS account.
Now let’s dive right in.
Step 1: Create a Notebook Instance
1. Log into the AWS Management console, type “SageMaker” in the search bar and select it.
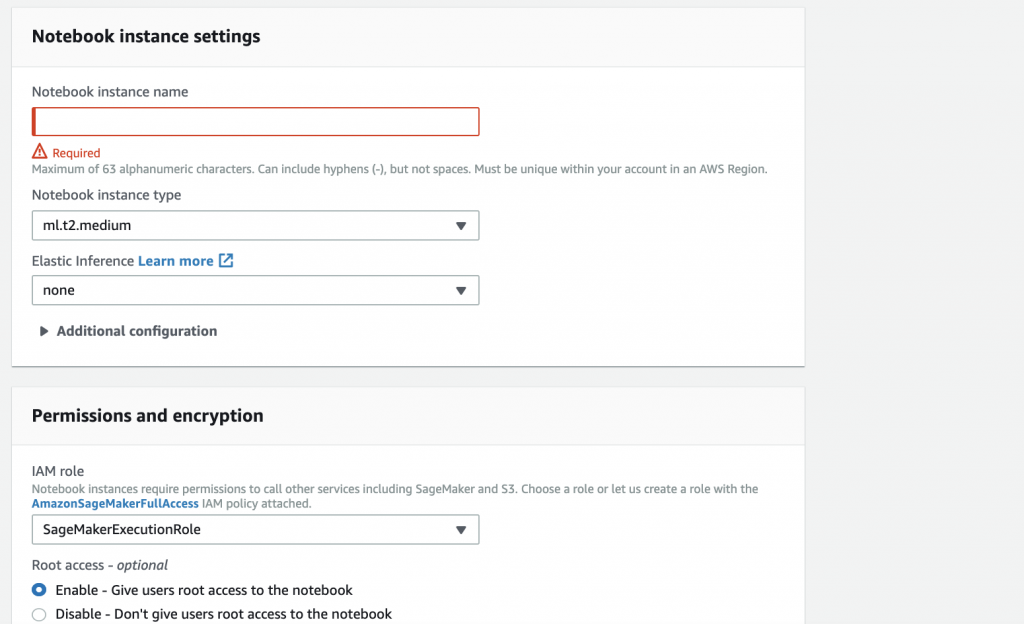
2. In the SageMaker console, click “Notebook instances,” then “Create notebook instance.”

3. Fill in the required information (like Notebook instance name or Notebook instance type), then click “Create notebook instance.”
4. When the server status changes from “Pending” to “Inservice,” click “Open Jupyter.”
Step 2: Load, Visualize, and Prepare Data
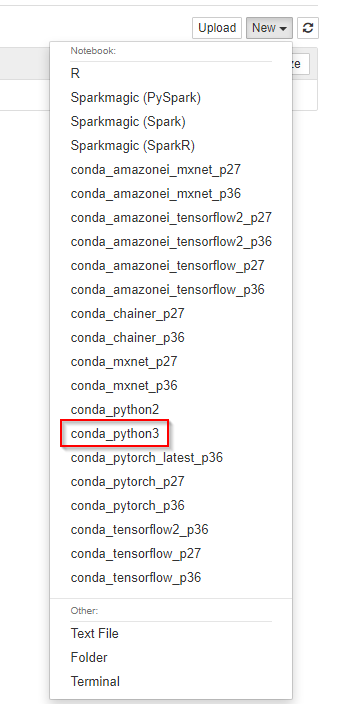
1. Once Jupyter opens, click “New” and select “Conda Python 3.”
2. Import the relevant libraries, define some environment variables in the notebook environment (as shown below), and run the cell.
import numpy as np
import pandas as pd
import matplotlib.pyplot as plt
import seaborn as sns
import boto3, re, sys, math, json, os, sagemaker, urllib.request
from sagemaker import get_execution_role
from IPython.display import Image
from IPython.display import display
from time import gmtime, strftime
from sagemaker.predictor import csv_serializer

# Define the IAM role
role = get_execution_role()
prefix = 'sagemaker/DEMO-xgboost-dm'
containers = {'eu-west-1': '685385470294.dkr.ecr.eu-west-1.amazonaws.com/xgboost:latest',
             'us-west-2': '433757028032.dkr.ecr.us-west-2.amazonaws.com/xgboost:latest',
             'us-east-1': '811284229777.dkr.ecr.us-east-1.amazonaws.com/xgboost:latest',
             'us-east-2': '825641698319.dkr.ecr.us-east-2.amazonaws.com/xgboost:latest'
             } # every region has its XGBoost container
my_region = boto3.session.Session().region_name # set the region of the instance
print("Success - the MySageMakerInstance is in the " + my_region + " region. You will use the " +
     containers[my_region] + " container for your SageMaker endpoint.")
3. Create an S3 bucket. The training data and model artifacts will be saved in the bucket. (In the screen capture below, the bucket name is “awsexperimentbucket1000.”)
If the S3 bucket is created successfully, your code will run without any errors (as shown below).
bucket_name = 'awsexperimentbucket1000' # you can always use any name as your bucket name
s3 = boto3.resource('s3')
try:
   if  my_region == 'us-east-1':
     s3.create_bucket(Bucket=bucket_name)
   else:
     s3.create_bucket(Bucket=bucket_name, CreateBucketConfiguration={ 'LocationConstraint': my_region })
   print('S3 bucket created successfully')
except Exception as e:
   print('S3 error: ',e)
4. Download the data, then load it into a dataframe.
If everything is successful, your code will run without any errors (as shown below).
'''
this is the link to the dataset
https://d1.awsstatic.com/tmt/build-train-deploy-machine-learning-model-sagemaker/
bank_clean.27f01fbbdf43271788427f3682996ae29ceca05d.csv", "bank_clean.csv"
'''
try:
 urllib.request.urlretrieve ("https://d1.awsstatic.com/tmt/build-train-deploy-machine-learning-model-sagemaker/bank_clean.27f01fbbdf43271788427f3682996ae29ceca05d.csv", "bank_clean.csv")
 print('Data downloaded successfully')
except Exception as e:
 print('Data load error: ',e)

try:
 df = pd.read_csv('./bank_clean.csv',index_col=0)
 print('Data loaded into dataframe successfully')
except Exception as e:
   print('Data load error: ',e)
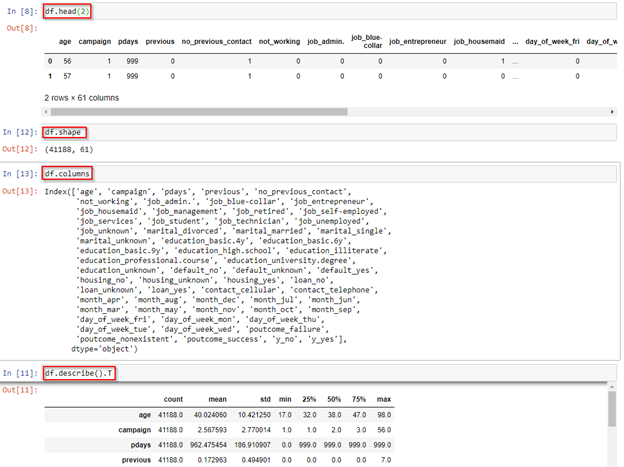
You can use the Pandas head, shape, or columns function to explore the dataset.
5. Divide the dataset into a train set and a test set.
The train set (75% of the data) will be used to build the model, while the test set (25% of the data) will be used to evaluate the model’s performance.
### the np.split() function splits the dataset into train and test set
train_df, test_df = np.split(df.sample(frac=1, random_state=42), [int(0.75 * len(df))])
print(train_df.shape, test_df.shape)
Step 3: Train the Model
In this step, you’ll train your ML model with the train_df dataset.
1. To use SageMaker’s prebuilt XGBoost model, reformat the dataset structure and load the data from the AWS S3 bucket. See code below:
pd.concat ([train_df['y_yes'], train_df.drop(['y_no', 'y_yes'], axis=1)],axis=1).to_csv('train.csv', index=False, header=False)
boto3.Session().resource('s3')
'train/train.csv')).upload_
s3_input_train =
sagemaker.s3_input(s3_data='content_type='csv')2. Set up an Amazon SageMaker session, instantiate the estimator (XGBoost model), then define its parameters. See code below:
session = sagemaker.Session()

xgboost_model = sagemaker.estimator.Estimator(containers[my_region],role, train_instance_count=1,
                                   train_instance_type='ml.m4.xlarge',output_path='s3://{}/{}/output'.
                                   format(bucket_name, prefix),sagemaker_session=session)

xgboost_model.set_hyperparameters(max_depth=5,eta=0.2,gamma=4,min_child_weight=6,subsample=0.8,silent=0,objective='binary:logistic',num_round=100)
3. Now that the dataset has been loaded and you’ve set up the estimator, use gradient optimization to train the model on the “ml.m4.xlarge” instance. See code below:
xgboost_model.fit({'train': s3_input_train})
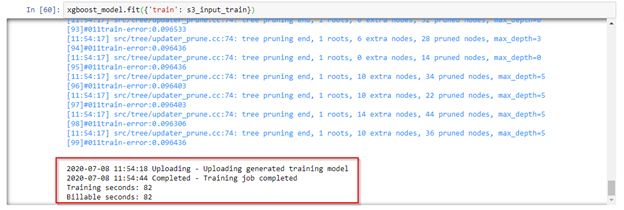
Violà! The model training is successful.
Step 4: Deploy the Model
1. Deploy the model built to an endpoint. See code below:
xgb_predictor = xgboost_model.deploy(initial_instance_count=1,instance_type='ml.m4.xlarge')
Once the deployment is successful, the code above will run without any errors.
Now that you’ve deployed the model, you can use the test set to generate a set of predictions. See code below.
test_df_array = test_df.drop(['y_no', 'y_yes'], axis=1).values #load the data into an array
xgb_predictor.content_type = 'text/csv' # set the data type for an inference
xgb_predictor.serializer = csv_serializer # set the serializer type
predictions = xgb_predictor.predict(test_df_array).decode('utf-8') # predict!
predictions_array = np.fromstring(predictions[1:], sep=',') # and turn the prediction into an array
pd.DataFrame(predictions_array).rename(columns={0: "predicted_values"})
Conclusion
Cloud computing and ML technologies are transforming the world we live in. Amazon SageMaker minimizes the need for maintenance and streamlines the machine learning pipelines while cutting costs. It’s a valuable tool for building end-to-end ML solutions at scale. I hope this article helps you get started.
