Last December, Amazon announced a new feature that many of us got excited about—one that allows you to run EKS pods on AWS Fargate. What exactly does this mean? How can this service help people who don’t spend much time on AWS? And, how can this service help someone who doesn’t regularly work with containerized solutions?
In this article, I’ll clarify the reasoning behind this new offering and explain why you should consider it for your next project. After reading it, developers who are not familiar with AWS’ containerized solutions should be able to get started with Kubernetes on AWS.
What Is AWS EKS?
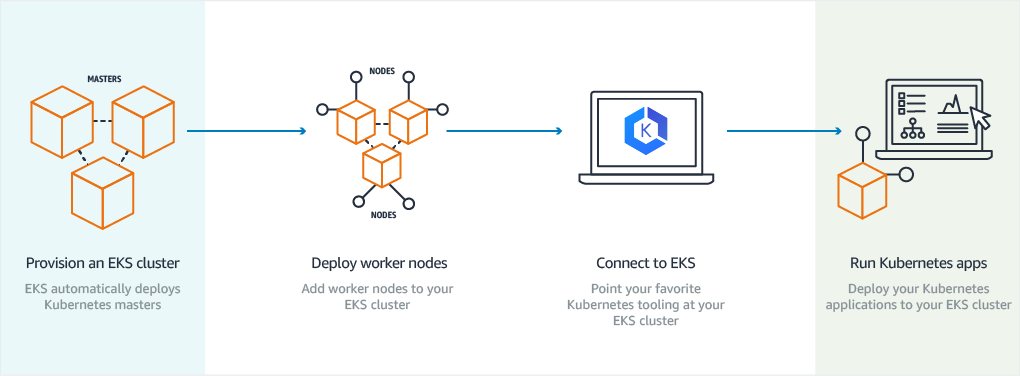
Amazon Elastic Kubernetes Service (AWS EKS) is a managed offering that allows you to run Kubernetes clusters on AWS. Amazon takes care of the master nodes (control panel), and you take responsibility for managing and provisioning the worker nodes. One advantage of using AWS EKS is its integration with other AWS services, such as AWS ECR, Elastic Load Balancing, and AWS IAM. The fact that AWS handles the master node frees you from the provisioning (patching, updating, securing, etc.) of a core component, letting you focus on the worker nodes where the pods will be run. This is still a lot of work, but at least the maintenance of the cluster’s cerebro-like component is removed from your plate. Take a look at this resource for getting started with AWS EKS.
What Is AWS Fargate?
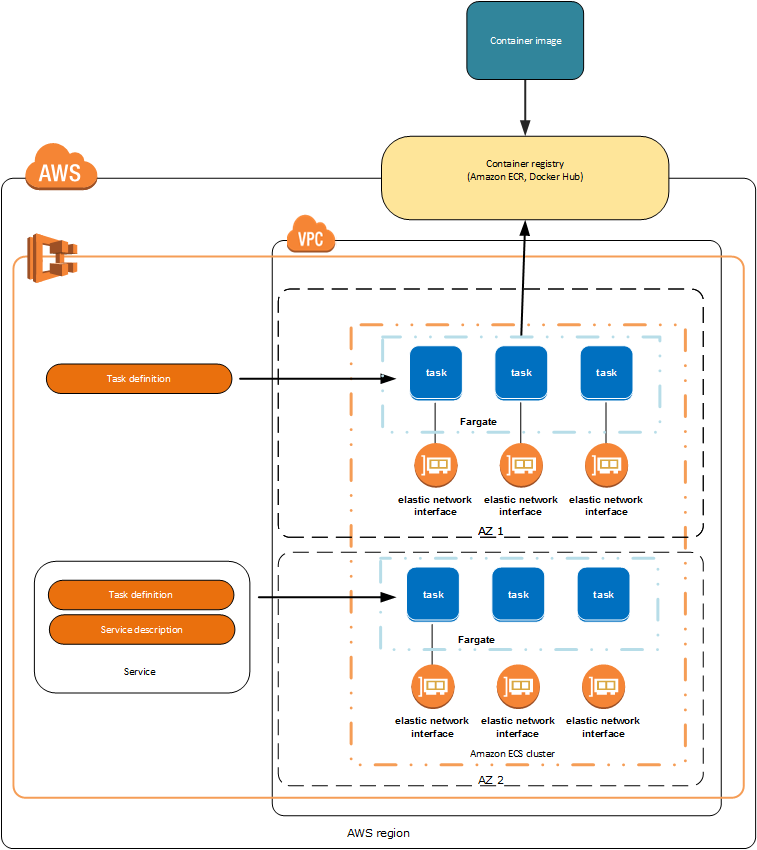
Before exploring AWS Fargate, you need to understand AWS Elastic Container Service (AWS ECS). AWS ECS is an in-house container management solution which allows you to run Docker containers within a cluster that is automatically managed by AWS. The service also provides integration with many other AWS offerings, including AWS IAM, load balancers, and container registry. In addition, AWS ECS has two launch types:
- The AWS EC2 launch type, which allows you to deploy the containers in a AWS EC2 cluster that you manage.
- The AWS Fargate launch type, which allows you to run containers in a serverless style through Fargate tasks. In this situation, you don’t need to provision the instances that will run the containers.
As you can see, AWS Fargate is really a launch type for AWS ECS. Many DevOps staff consider AWS Fargate a serverless container solution within the AWS ecosystem. Check out this guide to get started with AWS Fargate.
What Does “AWS EKS on Fargate” Mean?
As was mentioned earlier, traditional deployments of Kubernetes clusters on AWS require manual management and provision of worker nodes. In other words, the infrastructure that runs the pods is your responsibility. However, AWS’ new approach not only allows you to run the cluster’s master node in a managed fashion, it also manages the infrastructure in which pods are run via a Fargate Profile. Running a Kubernetes cluster on Fargate means that the infrastructure is fully managed, freeing you from all provisioning work. With this arrangement, you can forget about updating, patching, and securing and get focused on building your apps. AWS documentation summarizes all the benefits of this new EKS extension well, saying, “With Amazon EKS and AWS Fargate, you get the serverless benefits of Fargate, the best practices of Amazon EKS, and the extensibility of Kubernetes out of the box.”
Running AWS EKS on AWS Fargate is the path to follow if you want an entire Kubernetes cluster running under the serverless compute model.
Use Cases
A few use case scenarios for this mix of services are:
- Small teams. If you’re developing an application at scale (with containers) and your team is small (less than five developers), there likely won’t be enough time for provisioning or manually managing EC2 resources. When there’s no time for infrastructure, a managed serverless offering like AWS EKS on Fargate is the way to go.
- Prototyping. If you’re using containers and you need to validate an approach, don’t waste your time on infrastructure provisioning. Go serverless and get insights earlier. Later on, if the approach is viable and approved, you can redeploy the application with a better and more thoughtful architecture.
- Legacy projects. When your team gets a maintenance project which runs on Kubernetes and none of the developers are familiar with the orchestrator, run the pods on Fargate. That way, the team can buy some time to familiarize themselves with how Kubernetes works. Later on, they can switch to an EC2 cluster for the pods and make customizations as needed.
Limitations
Running AWS EKS on Fargate presents some limitations that are important to consider while defining a deployment approach. These include the following:
- There is no support for stateful workloads. This means that your containers or pods cannot have volumes or any file system-like mechanism. Pods with states or persistence layers need to be run on regular EC2 clusters.
- Only AWS Application Load Balancers are supported. In other words, your pods will receive traffic only via HTTP protocol.
- The physical capacity of a pod on Fargate has a maximum of 4 CPUs and 30 GBs of memory.
- You will get locked into a vendor.
Keep in mind that these limitations are for pods that run on Fargate. If any of these restrict you, you still can run pods on an AWS EC2-based cluster and have a mix of both models of execution.
Deploying a Small API on AWS EKS on Fargate
As an example, we’re going to deploy a small endpoint with AWS EKS on Fargate. The endpoint will be an HTTP GET handler written in Golang which returns a welcome message.
To do this, we’ll use the following tools:
- AWS CLI: Required for authentication.
- Docker: Required for building and pushing the Docker image.
- kubectl: The CLI needed to interact with the Kubernetes API.
- eksctl: The official CLI needed to create an EKS cluster.
Describing the API
Method | URL |
GET | / |
As mentioned above, the API consists of only one endpoint which maps to the root URL, so, when you hit it, you’ll receive a welcome message. On local, this message is:
curl http://localhost:5000
Welcome to the homepage
The code of the sample app can be found here. Pay special attention to the Dockerfile, as we will use it for building the image we need to push on AWS ECR. Let’s build the image in local with:
cd your-root-folder
docker build -t jorlugaqui/ahm .
Now, we can run the API locally with:
docker run --rm -p 5000:5000 jorlugaqui/ahmIt’s also worth mentioning that the same code example can be used to show how GCP Cloud Functions works. For more information about that, check out this post.
Building the Kubernetes Cluster
In order to have a Kubernetes cluster, we’ll need to:
- Push a Docker image on AWS ECR (not strictly required at this stage, but we’ll need an image anyway).
- Set permissions for your user.
To have an image on AWS ECR, we have to create a repository—done below on the AWS Console:

With the repository created, you can proceed to tag the image so it matches the ECR’s repository namespace:
docker tag jorlugaqui/ahm:latest xxx.dkr.ecr.us-east-1.amazonaws.com/ahm:latestNext, we can proceed with the image’s push:
docker push xxx.dkr.ecr.us-east-1.amazonaws.com/ahm:latestYour user will need to have some ecs,eks,fargate and ec2 policies assigned. For simplicity, I assigned some full access policies to my user that covered all of the permissions required for deploying a cluster. These permissions are:
- AmazonEC2FullAccess
- IAMFullAccess
- AmazonEC2ContainerRegistryFullAccess
- AWSCloudFormationFullAcess
- AmazonEKSFargatePodExecutionRolePolicy
- AmazonESKClusterPolicy
- AmazonESKWorkerNodePolicy
- AmazonESKServicePolicy
You can also create a user and inherit all policies from an admin user. In addition, it’s possible to define the exact permissions you need (granular fashion). Take a look at this post for more ideas about assigning permissions.
With the permissions in place, you can now create the Kubernetes cluster:
eksctl create cluster --name ahm-demo --fargateIf everything goes well, you should see an output like this:
[ℹ] eksctl version 0.13.0
[ℹ] using region us-east-1
[ℹ] setting availability zones to [us-east-1b us-east-1f]
[ℹ] subnets for us-east-1b – public:xxx.xxx.0.0/xxx private:xxx.xxx.xxx.0/xx
[ℹ] subnets for us-east-1f – public:xxx.xxx.xxx.0/xxx private:xxx.xxx.xxx.0/xxx
[ℹ] using Kubernetes version 1.14
[ℹ] creating EKS cluster “ahm-demo” in “us-east-1” region with Fargate profile
[ℹ] if you encounter any issues, check CloudFormation console or try ‘eksctl utils describe-stacks –region=us-east-1 –cluster=ahm-demo’
[ℹ] CloudWatch logging will not be enabled for cluster “ahm-demo” in “us-east-1”
[ℹ] you can enable it with ‘eksctl utils update-cluster-logging –region=us-east-1 –cluster=ahm-demo’
[ℹ] Kubernetes API endpoint access will use default of {publicAccess=true, privateAccess=false} for cluster “ahm-demo” in “us-east-1”
Pay attention to the flag –fargate; it tells AWS EKS to deploy the cluster along with a Fargate profile. It also schedules the coredns pods to run on Fargate instead of the regular EC2 type. You can confirm the cluster’s creation on the console, as seen in this screenshot:
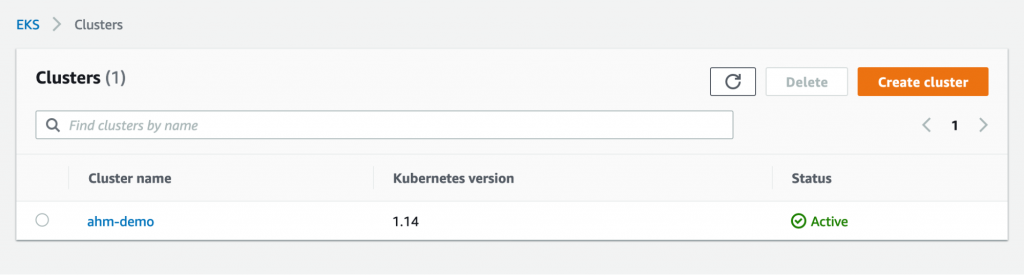
Be patient; this operation takes about 10 minutes.
Deploying the API
Now, let’s create a deployment with the image we previously pushed:
kubectl create deployment ahm-api --image=xxx.dkr.ecr.us-east-1.amazonaws.com/ahmYou should be able to see a running pod within the default namespace:
kubectl get podsNAME | READY STATUS | RESTARTS | AGE |
ahm-api-565cc55dd-m9czh | 1/1 Running | 0 | 83s |
Next, let’s check how many Fargate nodes we have running:
kubectl get nodes NAME | STATUS | ROLES | AGE | VERSION |
fargate-ip-xxx.ec2.internal | Ready | <none> | 45m | v1.14.8-eks |
fargate-ip-xxx.ec2.internal | Ready | <none> | 45m | v1.14.8-eks |
fargate-ip-xxx.ec2.internal | Ready | <none> | 59s | v1.14.8-eks |
Good news; we have three—two of them running the coredns pods, plus an extra running our ahm-api pod.
What is pending now is how to connect HTTP traffic with the deployed pods. In order to do so, we will need to configure an AWS ALB. For this step, follow this tutorial which describes how to configure the AWS ALB with the API’s pod.
The final result should be the possibility of hitting the endpoint on your browser with an URL like the following:

Please consider this tutorial as proof of concept. Do not deploy your APIs to production without using a proper HTTP server or without having unit testing or a CI/CD pipeline.
Conclusion
In this article, I’ve described different AWS containerized solutions. After explaining what AWS EKS is, I explained the main idea behind AWS Fargate and discussed how the mix of both services offers a new way of running Kubernetes clusters under a serverless approach. Deploying a small dummy API written in Golang demonstrated AWS EKS on Fargate in action.
Running AWS EKS’ pods on Fargate opens new possibilities for tech teams focused solely on product development. Since it alleviates provisioning work, team members can concentrate on producing code. However, AWS EKS on Fargate may not fit scenarios in which you want customizations at the worker node level. As with almost everything in tech, this combination is not a silver bullet, and you will have to consider the tradeoffs you’re making. Nevertheless, I think it’s worth trying. Check the pricing model and get hands-on!