In Part 1 of this series, we explored the basics of AWS IAM. Now, I’ll present a number of advanced implementations for AWS IAM—focusing on multi-account use cases—that could prove useful for your AWS workloads.
Why Use More Than One AWS Account?
AWS introduced AWS Organizations in 2016 to allow its customers to easily manage different AWS accounts. Using more than one AWS account can happen within your organization by accident (for example, if various departments all create their own account) or by choice. The latter is a deliberate decision made to isolate workloads, which can be done for a variety of reasons, such as:
- Security: Isolating a workload in a separate AWS account is a very strong and easy way to ensure data from one workload doesn’t leak into another.
- Budgeting: It might be easier to track expenses via separate accounts, for example, with individual accounts for development, staging, and production.
- Development: A separate account lets you easily spin up a dev environment to test or evaluate something.
- Costs: Separate, temporary accounts that you can simply delete when no longer needed can help limit unnecessary expenses.
I think the last point is quite crucial. I have seen so many organizations leaking money because of dangling resources, which were left there because they were forgotten or because nobody knows what they do, making everybody scared of deleting them. This probably rings a bell with you. Being able to delete the entire account, you can be 100% certain you won’t be billed for unused resources, and that will certainly help you manage your AWS bill.
In this manner, an AWS account becomes a temporary and disposable resource, just like a Docker container in your Kubernetes cluster. Of course, if the targeted account has a workload on it you want to keep, you’ll need to make sure you have the means to re-create it from scratch using automation tools.
All in all, I thoroughly encourage you to put some thought into using AWS Organizations. It’s a bit daunting at first, but it’s actually not that hard or complicated, and the benefits are real and numerous.
When you decide to create multiple AWS accounts, it’s advisable to avoid simply creating users and credentials everywhere. You should create your users in a top-level account and then give those users access to selected accounts. This way, administrators can easily track down which users have what permissions.
To give a user in one account (let’s call it the “parent” account) access to resources in another account (let’s call it the “child” account), you need to allow the former to assume a role in the child account, which will then grant access to the required resources. This user can obtain access to all resources in the child account with the appropriate role, such as AdministratorAccess.
Of course, the role in question must be created in the child account. If you use AWS Organizations, there’s a very easy way to do this, which I’ll explain a bit later. If you don’t currently use it, you’ll need to create the role yourself.
Are you a tech blogger?
So, log in to the child account via a user that has enough privileges (i.e., to create an IAM role). Next, in the IAM console, click on “Roles” and then “Create role;” the “trusted entity” should be “Another AWS account.” Enter the parent account ID in the “Account ID” field.
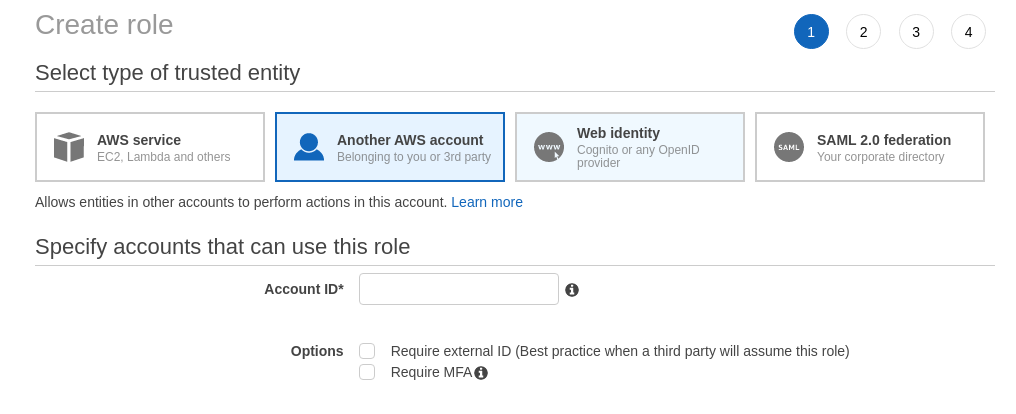
Click on “Next” and then select the permissions you want to grant this role. To give full access, select “AdministratorAccess” (this should be reserved for actual administrators); otherwise, select a more restrictive set of policies. Finally, give the role a name (make a note of this and the child account ID, as you will need those later), and create it.
Now, to give a user in the parent account access to the child account, log in to the parent account via a user with enough privileges, and create a policy that looks like this:
{
"Version": "2012-10-17",
"Statement": {
"Effect": "Allow",
"Action": "sts:AssumeRole",
"Resource": "arn:aws:iam::CHILD_ACCOUNT_ID:role/ROLE_NAME"
}
}
Attach that policy to the IAM user (or group) that should have access to the child account. Now that user can assume the role. Log in to the parent account via that user, click on your username in the top right corner of the screen, and click on “Switch Roles.”

In the next screen, enter the child account ID and the name of the role you previously noted down. You can enter a “Display Name,” which I usually set to the name of the child account. Click on “Switch Role,” and you’re done! It wasn’t that difficult after all. You’ll see that your username has been replaced with the “Display Name” you just entered, and if you click on that, you’ll see that the displayed information has expanded.
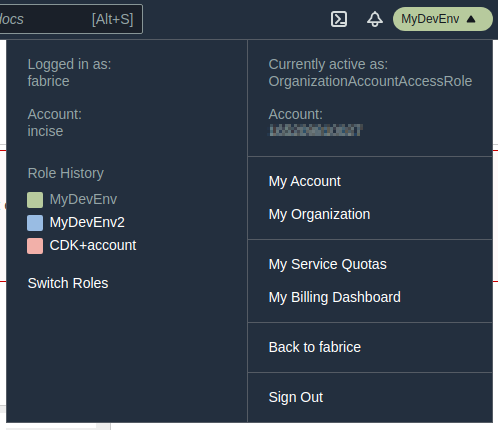
That box now has an additional section on the left-hand side showing your original username and account, plus a history of the roles you’ve assumed. As you can see, it is now very easy to switch from one account to another.
If you’re using AWS Organizations in the parent account, you can simply log in to your parent account as an admin user to create a brand new child account and get it added to your Organization. AWS will even create a role in the child account so you don’t have to do it yourself; by default, AWS names this role OrganizationAccountAccessRole.
When you created the role manually, you probably noticed a tick box to “Require MFA.” Ticking this checkbox will require the parent account’s user to have logged in using MFA before being able to switch roles.
Programmatic Access
It’s even possible for a user in the parent account to access the child account via programmatic access (i.e., through the AWS Command Line or SDKs). You’ll still need to create the child account and role as explained in the previous section. Now, in order to provide access to a user in the parent account, you will obviously need its AWS access key ID and secret access key. To configure your AWS credentials, install the AWS Command Line tool, and run the following:
$ aws configure –profile parentaccount
I always strongly recommend using a profile when creating a set of credentials. Unless you only ever access a single account using a single set of credentials, please avoid using the default profile. I’ve made a number of pretty serious mistakes by running the AWS Command Line or some other tools using the AWS SDK without specifying a profile, resulting in some pretty nasty changes in the default account instead of the account I wanted to target.
Once you’ve configured your credentials, you’ll need to manually edit the AWS configuration file, which is located at $HOME/.aws/config. So open the file with your favorite editor, and add a new profile for the child account, like so:
[profile childaccount]
output = json
region = us-east-1
role_arn = arn:aws:iam::CHILD_ACCOUNT_ID:role/ROLE_NAME
source_profile = parentaccount
This profile has two additional parameters:
- role_arn, which is the ARN of the role in the child account
- source_profile, which is the name of the profile for the parent account
From then on, you can use the childaccount profile to access the child account, for example:
$ aws –profile childaccount ec2 describe-instances
To spice things up (actually, to increase security), you can even request MFA for this programmatic access. You will need to edit the $HOME/.aws/config file again, add the mfa_serial parameter, and point it to the MFA virtual device in the parent account, like so:
[profile childaccount]
output = json
region = us-east-1
role_arn = arn:aws:iam::CHILD_ACCOUNT_ID:role/ROLE_NAME
source_profile = hatch-iam
mfa_serial = arn:aws:iam::PARENT_ACCOUNT_ID:mfa/MFA_NAME
Then, each time you access the child account programmatically, you will have to enter the passcode from your MFA device. (The STS token is cached for one hour, so you won’t have to do this again for one hour.)
The Right Way to Manage IAM: Infrastructure-as-Code (IaC)
At the end of the day, IAM users, roles, policies, and other objects are cloud resources just like any others. Usually, you’ll want to manage such resources using some kind of automation, and with IaC, the advantages are numerous:
- Your setup will be reproducible, meaning you can recreate all of your resources in a new account very easily; this will help if you want to consider your AWS accounts as disposable resources, like I explained earlier in this article.
- The IaC scripts serve as a reference and documentation; the users of your AWS accounts will no longer be puzzled about why something is done in a certain way or wonder why they were created like that in the first place.
- The IaC scripts can be version-controlled in a git repository, like any other text file.
Please keep in mind that user, group, and role names must be unique in a given account. This is because the IAM namespace is global and spans all AWS Regions. When you write your IaC scripts, this can easily be achieved by adding some stack-specific prefixes/suffixes to make the names unique. If you use CloudFormation, you don’t have to specify names when declaring such objects, as it will give you unique names that are actually quite intelligible. If you use Terraform, you can also use the same trick, but I found that Terraform-generated names are a bit obscure.
Miscellaneous
Did you know that you can store X.509 certificates in IAM? A big advantage of AWS IAM is that you can create your own certificates and keys and upload them to IAM. You can then use them to secure, say, load-balancer traffic. In fact, pretty much wherever you can use ACM certificates, you can use IAM certificates instead. The difference is that you can’t access the private key in the case of ACM certificates, so if knowing the private key is a requirement for your workload, you can consider storing the certificates in IAM rather than generating certificates in ACM. You can then use the IAM certificates in other AWS services, such as load balancers, almost like an ACM certificate.
If you have regulatory requirements, you might want to also enable CloudTrail for IAM. CloudTrail will log all calls to the AWS API, providing you with an audit trail of any changes made to your IAM objects.
Conclusion
In Part 1 of this article, you saw that having at least some basic knowledge about IAM is a minimum requirement to simply get going on AWS. You should now see that an in-depth understanding is necessary to create a secure architecture on AWS and take full advantage of its benefits for your workloads.
IAM can be quite difficult to master in full. Take your time, read the documentation, and take it one step at a time.