Nowadays, different processes are supported by various chat bots. Some are designed to guide users through the multiple steps of a complex process flow, but there are also a lot of small bots created to help users with trivial routine tasks—or even just for fun. In this post, I’m going to show you how to build a Telegram bot that will work as a URL shortener using serverless.
Why Serverless?
First of all, let’s discuss what serverless actually is. Martin Fowler defines it like this:
“Serverless architectures are application designs that incorporate third-party ‘Backend as a Service’ (BaaS) services, and/or that include custom code run in managed, ephemeral containers on a ‘Functions as a Service’ (FaaS) platform. By using these ideas, and related ones like single-page applications, such architectures remove much of the need for a traditional always-on server component. Serverless architectures may benefit from significantly reduced operational cost, complexity, and engineering lead time, at a cost of increased reliance on vendor dependencies and comparatively immature supporting services.”
In my opinion, the main takeaways here are:
- Abstraction: The servers are run and fully managed by third-party providers.
- The “pay-as-you-go” pricing model: The price depends on the amount of resources used.
In our Telegram bot implementation, we will use a Function-as-a-Service (FaaS) model and AWS Lambda. FaaS creates a high level of abstraction and increases development speed: Instead of thinking about the infrastructure, scalability, environment, etc., developers can focus only on the code and logic of individual functions, which are run in stateless containers.
In our case, FaaS is a great fit because the only actions needed to process requests are making a call to the API, sending a response, and quitting. Moreover, AWS Lambda pricing is based on the total execution time of the function, so you will never pay for idle time. AWS also offers a free tier that includes 400,000 GB/seconds per month. This means that the bot will actually operate for free—it’s literally impossible to exceed the free tier’s limits when working with a light-functionality app used by only a few people.
Bot Architecture and Workflow Overview
The bot’s general workflow will look like this:
- The user sends a message (the URL to be shorted) to the Telegram bot.
- The Telegram server receives the message and sends it to the Lambda function via a webhook (which we will set up later).
- The Lambda function takes the URL from the message and sends it to the free open cleanuri API, which will generate the short URL.
- The Lambda function sends the response to the particular Telegram chat it was invoked from. This can be achieved by a simple HTTP call to the Telegram API or by using special library methods.
- The user receives the shortened URL or an error message if something went wrong.

Development Prerequisites
In order to start developing the Lambda function, you will need an AWS account. If you haven’t created one yet, navigate to the AWS Free Tier page and sign up.
We are going to use Serverless Framework, one of the most popular and powerful tools for developing and maintaining serverless applications. In order to use it on your machine, install Node.js. Then run the following command:
npm install -g serverless
Lastly, configure Serverless Framework access to your AWS account:
npm install -g serverless serverless config credentials --provider aws --key xxxxxxxxxxxxxx --secret xxxxxxxxxxxxxx
The hidden parts of the above code (marked by the x’s) are the API and secret keys from your AWS account. These are used to make AWS services accessible from the application code, AWS CLI, or tools such as Serverless Framework. If you haven’t retrieved keys before, this guide may be helpful.
Implementing a Lambda Function
Let’s start by creating an AWS Lambda function, which will be triggered via Telegram HTTP webhook. This function will be responsible for making a call to the cleanuri API and sending the result to the user. To create the Lambda function, simply create a new folder on your machine, navigate inside of it, open a terminal window, and type the following:
serverless create --template aws-nodejs
As you probably guessed, this will create a very simple boilerplate for future Node.js Lambda functions. The boilerplate actually consists of two files: handler.js and serverless.yml. handler.js is the function’s code entry point, and serverless.yml is the serverless configuration file, where the serverless trigger and other settings can be declared.
You can read more about configuration files in Serverless Framework’s official documentation. For now, just replace the content of serverless.yml with the following lines:
service: short-bot

provider:

  name: aws

  runtime: nodejs10.x

  region: eu-west-1

functions:

  shortbot:

    handler: handler.shortbot

    events:

      - http:

          path: short-bot

          method: post

          cors: true
The above configuration means that:
- The new Node.js-based serverless “shortbot” will be created during the next deploy.
- The service consists of one AWS Lambda function, which can be triggered with a POST request to the newly created API Gateway /short-bot path.
- The code to execute is located in the shortbot function of the handler.js file.
To simplify the code we’re going to write, install the npm request and request-promise packages. The below command will create a basic package.json file.
npm init
Simply run the command and press enter each time different prompts appear.
Then run the package’s installation command:
npm install --save request request-promise
Next enter the code of the handler.js file:
const rp = require('request-promise');
const TELEGRAM_TOKEN = '        ';
async function getShortUrl(longUrl) {
  const options = {
    method: 'POST',
    uri: 'https://cleanuri.com/api/v1/shorten',
    form: {
      url: String(longUrl).trim()
    },
    json: true
  };

  return rp(options);
}

async function sendToUser(chat_id, text) {
  const options = {
    method: 'GET',
    uri: `https://api.telegram.org/bot${TELEGRAM_TOKEN}/sendMessage`,
    qs: {
      chat_id,
      text
    }
  };

  return rp(options);
}

module.exports.shortbot = async event => {
  const body = JSON.parse(event.body);
  const {chat, text} = body.message;

  if (text) {
    let message = '';
    try {
      const result = await getShortUrl(text);
      message = `Input: ${text}, \nShort: ${result.result_url}`;
    } catch (error) {
      message = `Input: ${text}, \nError: ${error.message}`;
    }

    await sendToUser(chat.id, message);
  } else {
    await sendToUser(chat.id, 'Text message is expected.');
  }

  return { statusCode: 200 };
};
The above code exports a “shortbot” function that will handle requests from the Telegram webhook and read messages sent by the user; then send requests to the cleanuri API and send the results to the same chat.
However, before deploying this “shortbot” function, you need to create your bot in Telegram. You’ll then get a secret token and paste it to the TELEGRAM_TOKEN variable on the second line of the JavaScript code above.
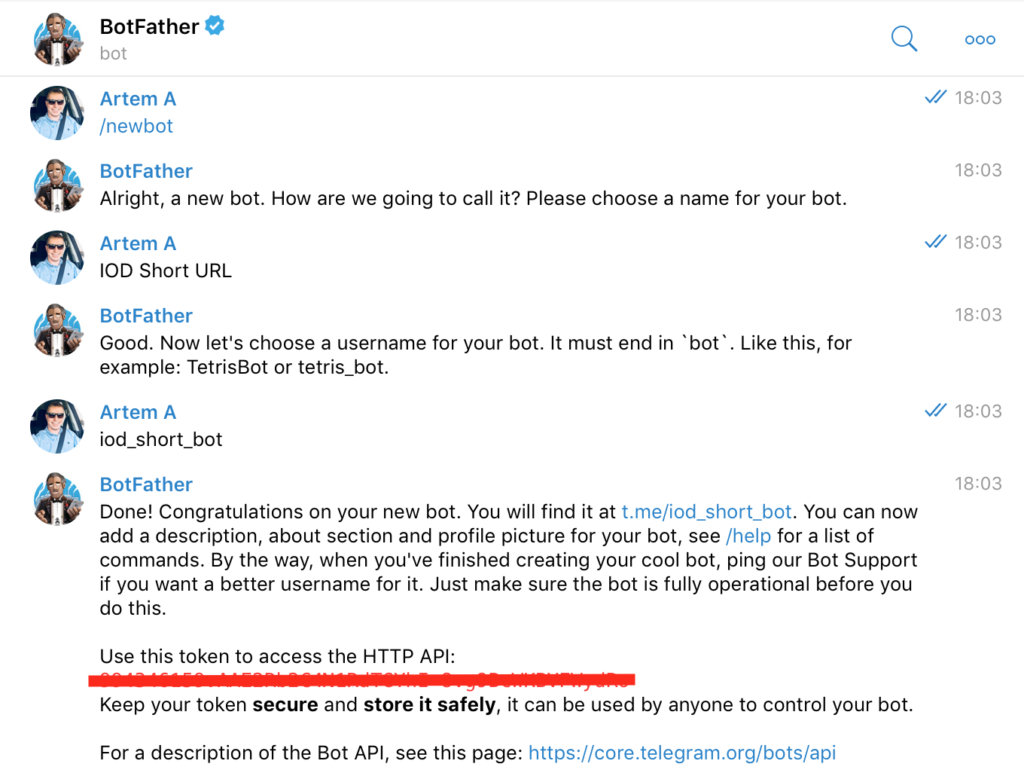
Create the Telegram Bot Using BotFather
According to Telegram, in order to create a new bot, you need to contact another bot, named BotFather, and follow his instructions. Sounds easy enough!

After BotFather generates your new bot, copy the token provided and paste it to the variable in the code. Now you can deploy your Lambda function and retrieve the URL for your bot’s webhook. To do that, run the following command in the projects directory:
serverless deploy
If all of the previous steps were done correctly, and no errors occurred during deployment, you should see the following result in the console, including the HTTP endpoint URL. Pretty, isn’t it?

The HTTP endpoint URL is the keychain connecting the Telegram servers with the logic of your bot. Now configure the webhook to make requests via this link each time users send a new message to the bot. FatherBot’s documentation states that the /setWebhook endpoint can be used to set up the webhook with a single POST request. Here is a short snippet you can use to make the request with a curl util:
curl --request POST --url https://api.telegram.org/bot<TELEGRAM_TOKEN>/setWebhook --header 'content-type: application/json' --data '{"url": "<LINK_YOU_GET_FROM_SERVERLESS_DEPLOY>"}'
Don’t forget to replace placeholders with corresponding values. If the request is successful, your work is done, and the bot is ready to test!
Try the Bot
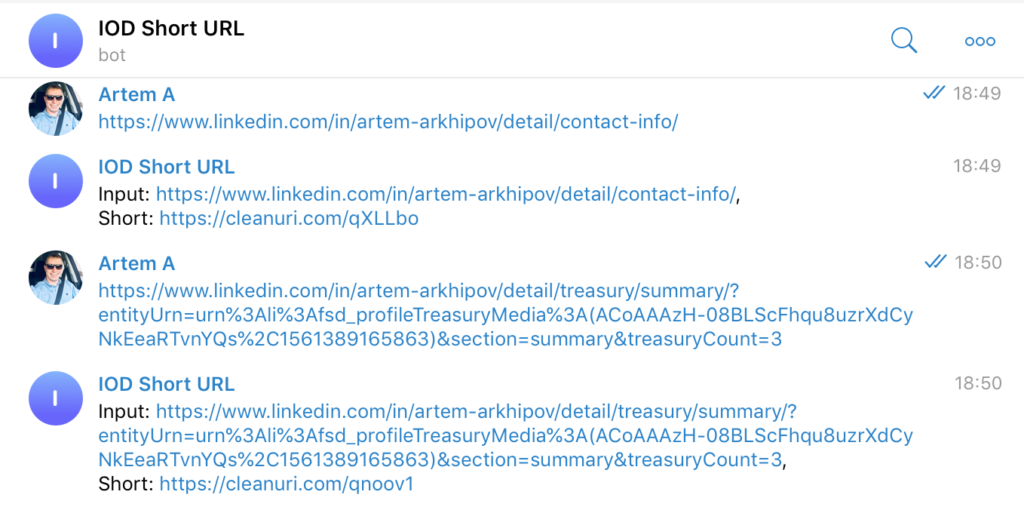
To make sure everything’s working as it should, send a URL to the bot, wait a second (or even less), and enjoy the result!

Conclusion
As I’ve shown, the basic Telegram bot is quite easy to set up, and its workflow is pretty straightforward. Moreover, with the use of configurable webhooks and a serverless approach, it’s very cost effective to operate bots, as you aren’t billed for idle time.
Just remember: Telegram’s documentation is helpful and easy to read. There you can discover multiple bot scenarios, learn how to implement different commands for your bots, create chat games, and even accept payments.
While the serverless Telegram bot we implemented today is very simple, it’s definitely useful—and comfortable to use. Yes, its functionality is quite narrow in comparison to other modern chatbots, but I hope it will inspire and motivate you to create your own interesting, powerful, and cost-effective tools. Good luck!

