AWS has been promoting serverless computing for many years now. The whole journey started with AWS Lambda, which enables event-driven workflows without you having to worry about server provisioning. Serverless computing removes the need for you to manage the capacity of your servers, letting you specify and pay for the actual consumption of resources per each application.
Extending such serverless computing to containers, AWS introduced AWS Fargate, designed for AWS ECS and EKS services. To set up an ECS or EKS container environment, you generally need to select an appropriate EC2 instance, create a cluster, and manage the scaling capacity for it, which, of course, may cause issues with overprovisioning or underprovisioning. AWS Fargate steps in to handle this for you so that you can concentrate on deploying applications instead of worrying about infrastructure.
In this article, I will be showing you how AWS Fargate works and how you can build EKS clusters with very simple steps without needing to know it’s internal implementation.
AWS Fargate: How It Works

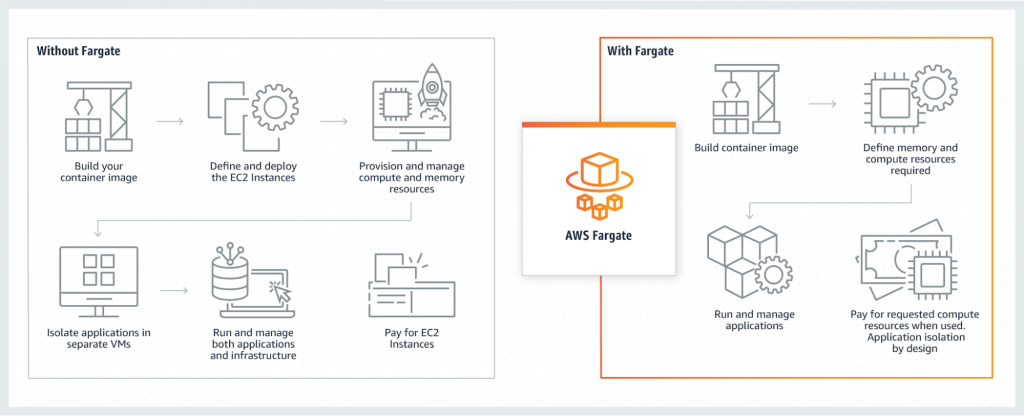
Figure 1: AWS Fargate (Source: AWS)
As described earlier, you would need to put a lot of effort into defining and configuring EC2 instances without the Fargate solution. But with AWS Fargate, you can just build a container image by configuring how much memory and compute resources your application would need. You don’t even have to worry about the security isolation of the application as it comes by design.
AWS EKS
AWS EKS is the service for developers looking to use Kubernetes as their container platform to deploy applications.
EKS has two major components:
- The Amazon EKS control plane, which is a scalable and highly available component that runs across multiple AZs; it also runs Kubernetes software such as etcd and API Server.
- The Amazon EKS nodes registered with the control plane, which are the nodes where you run your servers and applications on pods.
EKS enables your container workloads to be integrated with services such as AWS CloudWatch, Auto Scaling Groups, IAM, and VPC. It provides your DevOps team with smooth monitoring of production issues, scaling on demand, and load-balancing for mission-critical applications.
EKS also provides support to integrate with AWS App Mesh, which provides all the service mesh features for Kubernetes. App Mesh enables applications to communicate with each other with fine-granular control using network traffic controls, security, and end-to-end visibility features.
There are two separate ways to launch a Kubernetes cluster on AWS.
EKS Launch Type – EC2
Here, worker nodes inside AWS EKS are scheduled to run pods. These nodes, built using EC2 instances, can build a cluster. All instances in a cluster:
- Should be of the same instance type
- Should be running with the same AMI (AWS also provides EKS-optimized AMIs that include Docker, kubelet, and AWS IAM Authenticator.)
- Should use the same EKS node IAM role
You need to provision and maintain the EC2 instances.
EKS Launch Type – AWS Fargate
The second option for launching a Kubernetes cluster on AWS is Fargate. Contrary to the EC2 type, this method doesn’t need any configuration for your infrastructure setup. AWS EKS provides controllers, running on the control plane, that abstract the server provisioning. These controllers also schedule Kubernetes pods onto Fargate. For each EKS cluster, you would need a Fargate profile configured to identify which pod needs to be launched.
As the infrastructure is abstracted for Fargate users, who would naturally be concerned about the security of their workload, AWS has enabled an isolation boundary at the pod level. This ensures it doesn’t share underlying resources such as a kernel, CPU, memory, or ENI with other pods.
Are you a tech blogger?
EKS Cluster Setup with AWS Fargate
Below, I’ll lay out the steps needed to set up an EKS cluster using AWS Fargate.
1. Install eksctl. EKS requires the command line tool eksctl to create a Kubernetes cluster. You can download it using this link.
2. Create Cluster. Use the command below to create a new cluster:
eksctl create cluster --name --version <1.18> --fargate
Here, I’ve used the –fargate option that creates an EKS cluster, but it won’t have any node group in it. However, the command also creates a pod execution role and two Fargate profiles for the default namespace and the kube-system namespace. By default, CoreDNS is configured to run on an EC2 infrastructure, and the above command also takes care of updating this configuration so that the cluster can run on Fargate.
3. Create a pod execution role. If you already have a cluster and didn’t use eksctl to create one, you need to create the pod execution role separately. This role is required by pods to make calls to AWS APIs to pull container images from AWS ECR.
4. Create a Fargate profile for your cluster. When a pod is requested to deploy in an EKS cluster, the determination of the pod (mapped resources underneath) is done based on the Fargate profile configuration. If you create a cluster using eksctl, you would get a profile created with a default namespace. However, you would want to create a profile matching the application’s Kubernetes namespace.
Below is the command syntax for creating a profile using eksctl (you can also use AWS Console):
eksctl create fargateprofile --cluster --name --namespace --labels <key=value>
5. Update CoreDNS. Again, if you’ve created the cluster using the eksctl command, this step can be ignored as it is already set up. If you already have an existing cluster, you can use it directly for Fargate by updating the CoreDNS configuration and removing the eks.amazonaws.com/compute-type : ec2 annotation. The cluster will also require a Fargate profile to target the CoreDNS mapping to pods.
6. Verify that the node is running with an AWS Fargate profile. Now that the cluster is ready, you can verify it by using the kubectl CLI. Run the command below to view the nodes:
kubectl get nodes
7. Set up ALB. The next step is to deploy Application Load Balancer on EKS to load-balance your application traffic across pods; ALB can also be used across numerous applications within one Kubernetes cluster.
8. Deploy your application. The EKS cluster and ALB are now set up to run an application. You can deploy any application or server on Fargate. For this example, I’ll deploy the Nginx server via the command below by using it’s Docker image:
kubectl create deployment nginxserver –image=nginx:1.14.2 –namespace=appns
9. Verify the pod is running with a Fargate profile. You can now run the following commands to observe that the pod is deployed with a Farage profile rather than a worker node based on an AWS EC2 instance:
kubectl get pods
kubectl describe pod
Important Things to Remember
- Application Load Balancer is recommended for EKS.
- A pod deployment may get stuck in Pending status if it doesn’t match with the Fargate profile.
- AWS Fargate doesn’t support Daemonsets. An alternative solution is a sidecar container.
- A Security group cannot be applied on a running pod.
- Fargate pods require private subnets—they cannot be run on public subnets.
- AWS Fargate supports VM-isolation for each pod, ensuring that resources are not being shared with other pods.
- AWS Fargate doesn’t support GPUs as of now.
Summary
In this article, I have shown you the various options available to set up EKS and how AWS Fargate can be used to build EKS clusters to run serverless containers on it. I have also talked about how to deploy an application on these clusters with a very few simple kubectl commands. This enables your team to focus on designing, building, and deploying applications on AWS Cloud without worrying about infrastructure provisioning and patching. AWS Lambda for event-driven workloads and EKS for Kubernetes-based containerized workloads have picked up good traction, and more and more teams are adopting these services to host their workloads on AWS Cloud.

